As we know, Tinkercad introduces a new feature in the Tinkercad circuit, which is Microbit. We can make a virtual prototype in making things related to Microbit, and even can do a simulation. We can save lots of money to build an experiment without having to damage our electronic components. Moreover, we can add some codes to bring the experiment to work.
Unfortunately, after reading Tinkercad's blog, this launch has a drawback. When exporting the code, Tinkercad only transfers it into Javascript language. You need to change the code by using a third-party like Microsoft Makecode, for it requires a hex file to work directly in Microbit.
Initially, I made a simulation in Tinkercad to build and explore this experiment. Turnout, my simulation is not like I expected. My next step is I prepared the code using Microsoft Makecode, for I will use continuous servos instead of micro servos, which Tinkercad only provided micro servos in the circuit.
I decided to make a robot using Microbit as its brain. To make the robot more pleasant and challenging, I added some motions using servo motors, LEDs, images, and talking features.
For those who do not work yet with Microbit, please read the overview guide of Microbit in this link.
For downloading the enclosure, click Cults3D.
Materials you will need:
Tinkercad
Microbit
Microsoft Makecode and Python Editor
3D printer
PLA filament (Metal, blue, yellow, red, wood, and green)
Speaker
Alligator clip
Electrical wires
Jumper wires
Electrical tape
Hot glue
Makita Drill
Dremel rotary tool
Cutting Pliers
Solder iron
Solder
2 LEDs
4 Batteries of AA + holder
2 Batteries of AAA + holder
Make Simulation in Tinkercad
Before we make a prototype, it is crucial to make a simulation in Tinkercad. By doing this simulation, we can play around with the electronic circuit, so we become aware and understand whether we make a mistake in our circuit or not.
As I mentioned previously, Tinkercad only has micro-servos in its library, while I would like to use continuous servos (because I have enough continuous servos in my inventory, instead of micro-servos). How to solve this problem? Well, I had to use another alternative, which is making the block code in another third party, such as Microsoft Makecode.
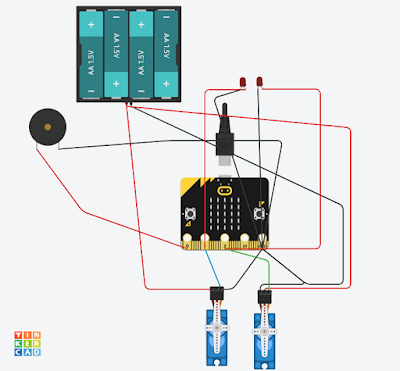
At least, Tinkercad helps a lot in my simulation. Here I screenshot my electronic circuit. Actually, Microbit requires a maximum of 3V (two batteries of AAA) as its power source. But to operate two servos, it needs an additional four batteries of AA (6V). Otherwise, the servos would not propel.
The Servos
In this project, I used two continuous servos to rotate the hands.
The servo has three lines, which are signal lines (orange-1), electric power line positive (red-2), and negative/ground line (black-3).
- Signal lines, which are represented as blue and green wires in the circuit diagram above, in servos connected to pin 1 and 2 in Microbit, respectively.
- The positive line in both servos should connect to the positive pole of the battery, and so the negative line (ground) should connect to the negative pole of the battery.
- Both servos connect to the ground (GND) in Microbit, and only one servo connects to the negative pole of the battery as well.
The LEDs
I used two LEDs for my robot, which I used white LEDs. These LEDs are utilized for the eyes of the robot. Therefore, I connect the positive legs of the first LED to pin 1 in Microbit and the second LED to pin 2 in Microbit.
The first LED is supposed to be for the left eye and the second one is for the right eye. Both negative legs of the LEDs are connected to the ground (GND) in Microbit.
The Speaker
Connect the speaker to the Microbit as follows:
- Positive wire connects to Pin 0 in Microbit
- Negative wire connects to Pin GND in Microbit
The Code
I made the block code in Microsoft Makecode. The code should be like in the image. Also, I shared my code. Here is the link.
In this code, if we press button A, it will show some images first and then, turn on the LED for the left eye, and rotate the left hand. It will have the same condition if we press button B, only this time for the right side.
Advance Code for making the robot talks
In making the robot talks, it cannot be done with a coding block. To overcome this problem, we need to convert all the codes into Python. Here is the link for Python Editor for online and offline (you need to download it first).
Before converting, try to convert all codes in Makecode by using the Python language. Turnout, the converting is not compatible with the Python editor. We need to change few codes, so Python can understand the code. Here is the preference link for Python codes.
For all the codes in Python, click this link.
Here are the explanations of the codes.
To rotate the servo in pin 1 in Microbit and pause 1000 milliseconds (1 second)
pin1.write_analog(180)
sleep(1000)
To turn on the LED eye in pin 1 in Microbit and pause 1000 milliseconds (1 second)
pin1.write_digital(0)
sleep(1000)
To make the robot talks, first import the speech module. I used 2 types of speak commands, which are "speech.pronounce" and "speech.say".
When using "speech.say", we need to add some words inside the parentheses after the command as parameters.
speech.say("Let's play with me.", speed=92, pitch=60, throat=190, mouth=190)
We want the robot to talk " Let's play with me." With speed, pitch, throat, and mouth as we desired. To know more about these parameters, click this preference guide.
When we use "speech.pronounce", we use Phonemes as the parameter. For more information about phonemes, click this link.
speech.pronounce("Woh5oh3t ahahr yuhuh duhuhihihnx nnahah3uh5uh8", speed=92, pitch=60, throat=190, mouth=190)
In the code above, we make the robot to talk, "What are you doing now?"
Just play around with the speech command as you desired.
Save and download the code into the HEX file.
Enclosure
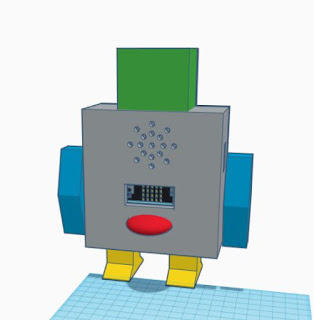
To make the enclosure for the robot, I made it in Tinkercad. For download, click Cults3d.
Microbit Case
We need to build the case for Microbit, so the Microbit could stand in place in the body of the robot. To make it, I used the simple shape of a box with dimension:
Length: 66 mm
Width: 21 mm
Height: 50 mm
Cut the box with some box holes as shown in the pictures. To make it easier, use the Microbit feature from the Tinkercad circuit.
Body- front part
For the front body, drop a box in the work area. Make a hole in the cylinder on the top with the same measurement as the hole in the head. Make some holes for the speaker,
Microbit, and the servo. Add four placeholders for placing the screws on each corner.
Body- back part
For the back part of the body, use two boxes, and stack them. The dimension should be the same as the front part of the body and the head. Group them together.
Legs
For the legs, use a box and combine it with a wedge. For the dimension, see the images. Group them together.
Hands
For making hand, drag and drop two roofs into the work area. Cut each roof with a box hole. Group them together. Duplicate the hands, so you have two hands now.
Head
Use a box for the head. Make some holes for the back part of the head. Make a placeholder for the screw.
Mouth
For the mouth, use a sphere and resize it as shown in the image.
Tail
Make the same shape as a mouth for the tail, only it is wider.
Prototype and Test
In doing an electronic project, it is crucial to make the prototype before assembling the electronic circuit.
By building a prototype, we can test whether our code and electrical circuits are correct or not. The test is quite successful. All electrical components are working smoothly.
Printing
Save each of the parts of the 3D Model into .stl files. Using Cura slicer, slice the .stl files and print them with the color of PLA filament as you desired. The printing settings are layer height 0.2 mm, infill 20%, using brim, and no support, except the Microbit case.
After printing
Remove the support in the Microbit case after printing.
Drilling After Printing
Make holes for the eyes to the head casing. I use a Makita drill to make the holes. Drill two holes in the head and measure the holes for LED about a diameter of 5 mm.
Tidying the Speaker
I used a speaker from my old microphone set. Because of it, the speaker's edges are not tidy. Cut the excess of the speaker and file with Dremel rotary tool.
Assemble the Printing Parts
Glue the mouth to the front body.
Glue the tail to the back part of the body.
Assemble the legs to the body and finally, glue the head to the body.
Build the Electrical Circuit
- Put the Microbit in the case.
- Insert alligator clips to pin 0 (red), 1 (yellow), 2 (white), and Gnd (black).
- Place the servos on each side as shown in the picture and glue them to the body.
- Solder the LEDs with wires. Red wires connect to the positive legs of LED and black wires connect to the negative legs. Insert the LEDs to the head and secure them with electrical tape.
- Connect all the alligator clip wires like in the previous prototype.
Construct the Robot
Upload the hex file to the Microbit. Put the Microbit and speaker inside the enclosure. Connect the Microbit with the batteries. Tidy up all the wires and secure them with electrical tape.
Close the enclosure with screws. (We need 5 small screws).
Attach the hands with servos.
Final Result and Test the Robot
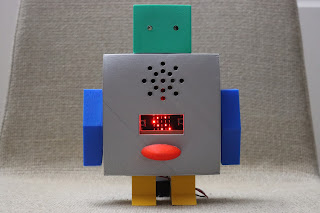
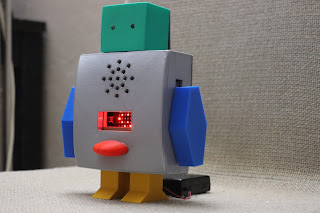
Here is the final result of the Microbit Talking Robot.
If we press button A, it will show some images of hearts and smile first and then, turn on the LED for the right eye, and rotate the right hand. It will have the same condition if we press button B, only this time for the left side.
Note: I installed Microbit upside down due to the tight enclosure, so the result would be the opposite of my previous code.
Updated on January 6, 2021:
Got featured and got into homepage in instructables.com


